This post will describe how to setup keyboard shortcuts in QubesOS so that you can temporarily disarm (pause) the BusKill laptop kill cord.
This allows the user to, for example, go to the bathroom without causing their computer to shutdown or self-destruct.
This is a guide that builds on part one: A Laptop Kill Cord for QubesOS (1/2). Before reading this, you should already be familiar with how to setup udev rules for BusKill on QubesOS.
- A Laptop Kill Cord for QubesOS (1/2)
- Disarm BusKill in QubesOS (2/2)
ⓘ Note: This post is adapted from its original article on Tom Hocker’s blog.
What is BusKill?
What if someone literally steals your laptop while you’re working with classified information inside a Whonix DispVM? They’d also be able to recover data from previous DispVMs–as Disposable VM’s rootfs virtual files are not securely shredded after your DispVM is destroyed.
Are you a security researcher, journalist, or intelligence operative that works in QubesOS–exploiting Qubes’ brilliant security-through-compartimentalization to keep your data safe? Do you make use of Whonix Disposable VMs for your work? Great! This post is for you.
I’m sure your QubesOS laptop has Full Disk Encryption and you’re using a strong passphrase. But what if someone literally steals your laptop while you’re working with classified information inside a Whonix DispVM? Not only will they get access to all of your AppVM’s private data and the currently-running Whonix DispVM’s data, but there’s a high chance they’d be able to recover data from previous DispVMs–as Disposable VM’s rootfs virtual files (volatile.img) are not securely shredded after your DispVM is destroyed by Qubes!
Let’s say you’re a journalist, activist, whistleblower, or a human rights worker in an oppressive regime. Or an intelligence operative behind enemy lines doing research or preparing a top-secret document behind a locked door. What do you do to protect your data, sources, or assets when the secret police suddenly batter down your door? How quickly can you actually act to shutdown your laptop and shred your RAM and/or FDE encryption keys?
BusKill utilizes a magnetic trip-wire that tethers your body to your laptop. If you suddenly jump to your feet or fall off your chair (in response to the battering ram crashing through your door) or your laptop is ripped off your table by a group of armed thugs, the data bus’ magnetic connection will be severed. This event causes a configurable trigger to execute.
The BusKill trigger can be anything from:
- locking your screen or
- shutting down the computer or
- initiating a self-destruct sequence
While our last post described how to setup such a system in QubesOS with BusKill, this post will describe how to add keyboard shortcuts to arm & disarm the dead man switch (eg so you can go to the bathroom).
Disclaimer
This guide contains experimental files, commands, and software. The information contained in this article may or may not lead to corruption or total permanent deletion of some or all of your data. We’ve done our best to carefully guide the user so they know the risks of each BusKill trigger, but we cannot be responsible for any data loss that has occurred as a result of following this guide.
The contents of this guide is provided openly and is licensed under the CC-BY-SA license. The software included in this guide is licensed under the GNU GPLv3 license. All content here is consistent with the limitations of liabilities outlined in its respective licenses.
We highly recommend that any experiments with the scripts included in this article are used exclusively on a disposable machine containing no valuable data.
If data loss is a concern for you, then leave now and do not proceed with following this guide. You have been warned.
Release Note
Also be aware that, due to the risks outlined above, BusKill will not be released with this “self-destruct” trigger.
If you purchase a BusKill cable, it will only ship with non-destructive triggers that lock the screen or shutdown the computer. Advanced users can follow guides to add additional destructive triggers, such as the one described in this post, but they should do so at their own risk–taking carefully into consideration all of the warnings outlined above and throughout this article.
Again, if you buy a BusKill cable, the worst that can happen is your computer will abruptly shutdown.
Assumptions
This guide necessarily makes several assumptions outlined below.
sys-usb
In this guide, we assume that your QubesOS install has a USB-Qube named ‘sys-usb‘ for handling USB events on behalf of dom0.
If you decided to combine your USB and networking Qubes at install time, then replace all references in this guide for ‘sys-usb‘ to ‘sys-net‘.
If you decided to run your ‘sys-usb‘ VM as a DispoableVM at install time, then replace all references in this guide for ‘sys-usb‘ its Disposable TemplateVM (eg ‘fedora-36-dvm‘).
..And if you chose not to isolate your USB devices, then may god help you.
Udev Device Matching
BusKill in Linux uses udev to detect when the USB’s cable is severed. The exact udev rule that you use in the files below will depend on the drive you choose to use in your BusKill cable.
In this guide, we identify our BusKill-specific drive with the ‘ENV{ID_MODEL}=="Micromax_A74"‘ udev property. You should replace this property with one that matches your BusKill-specific drive.
To determine how to query your USB drive for device-specific identifiers, see Introducing BusKill: A Kill Cord for your Laptop. Note that the `udevadm monitor --environment --udev` command should be run in the ‘sys-usb‘ Qube.
ⓘ Note: If you’d prefer to buy a BusKill cable than make your own, you can buy one fully assembled here.
QubesOS Version
This guide was written for QubesOS v4.1.
[user@dom0 ~]$ cat /etc/redhat-release
Qubes release 4.1.2 (R4.1)
[user@dom0 ~]$
BusKill Files
This section will describe what files should be created and where.
Due to the design of QubesOS, it takes a bit of mental gymnastics to understand what we’re doing and why. It’s important to keep in mind that, in QubesOS
- The keyboard and UI are configured in ‘
dom0' - USB devices (like the BusKill device) are routed to the ‘
sys-usb‘ VM - dom0 has the privilege to execute scripts inside other VMs (eg ‘
sys-usb‘) - By design, VMs should *not* be able to send arbitrary commands to be executed in dom0
- …but via the qubes-rpc, we can permit some VMs (eg ‘
sys-usb‘) to execute a script in dom0 (though for security reasons, ideally such that no data/input is sent from the less-trusted VM to dom0 — other than the name of the script)
Due to the constraints listed above:
- We’ll be configuring the disarm button as keyboard shortcut in dom0
- We’ll be saving and executing the ‘
buskill-disarm.sh‘ script in ‘sys-usb‘ (because these scripts manipulate our udev rules) - The keyboard shortcut in dom0 will actually be executing the above script in ‘
sys-usb‘
sys-usb
If you followed our previous guide to setting-up BusKill in QubesOS, then you should already have a file in ‘sys-usb‘ at ‘/rw/config/buskill.rules‘. You may even have modified it to trigger a LUKS Self-Destruct on removal of your BusKill device.
Because you’re now experimenting with a new setup, let’s go ahead and wipe out that old file with a new one that just executes a soft-shutdown. You might need some days to get used to the new disarm procedure, and you probably don’t want to suddenly loose all your data due to an accidental false-positive!
Execute the following on your ‘sys-usb‘ Qube:
mv /rw/config/buskill.rules /rw/config/buskill.rules.bak.`date "+%Y%m%d_%H%M%S"`
cat << EOF | sudo tee /rw/config/buskill.rules
################################################################################
# File:    sys-usb:/etc/udev/rules.d/buskill.rules -> /rw/config/buskill.rules
# Purpose: Add buskill rules. For more info, see: https://buskill.in/qubes-os/
# Authors: Michael Altfield <michael@buskill.in>
# Created: 2020-01-02
# License: GNU GPLv3
################################################################################
ACTION=="remove", SUBSYSTEM=="usb", ENV{ID_MODEL}=="Micromax_A74", RUN+="/usr/bin/qrexec-client-vm dom0 buskill.softShutdown"
EOF
sudo ln -s /rw/config/buskill.rules /etc/udev/rules.d/
sudo udevadm control --reload
Now, let’s add a new udev ‘.rules‘ file. This one will always just lock your screen, and it’s what will be put in-place when BusKill is “disarmed”.
Execute the following on your ‘sys-usb‘ Qube:
cat << EOF | sudo tee /rw/config/buskill.lock.rules
################################################################################
# File:    sys-usb:/etc/udev/rules.d/buskill.rules -> /rw/config/buskill.lock.rules
# Purpose: Just lock the screen. For more info, see: https://buskill.in/qubes-os/
# Authors: Michael Altfield <michael@buskill.in>
# Created: 2023-05-10
# License: GNU GPLv3
################################################################################
ACTION=="remove", SUBSYSTEM=="usb", ENV{ID_MODEL}=="Micromax_A74", RUN+="/usr/bin/qrexec-client-vm dom0 buskill.lock"
EOF
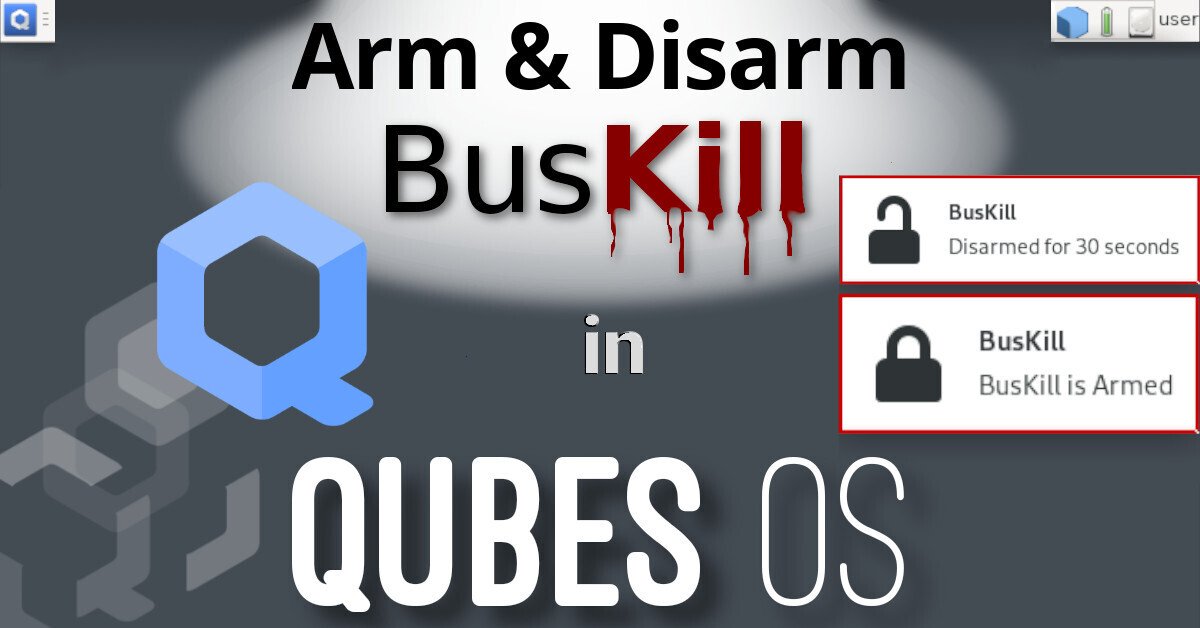
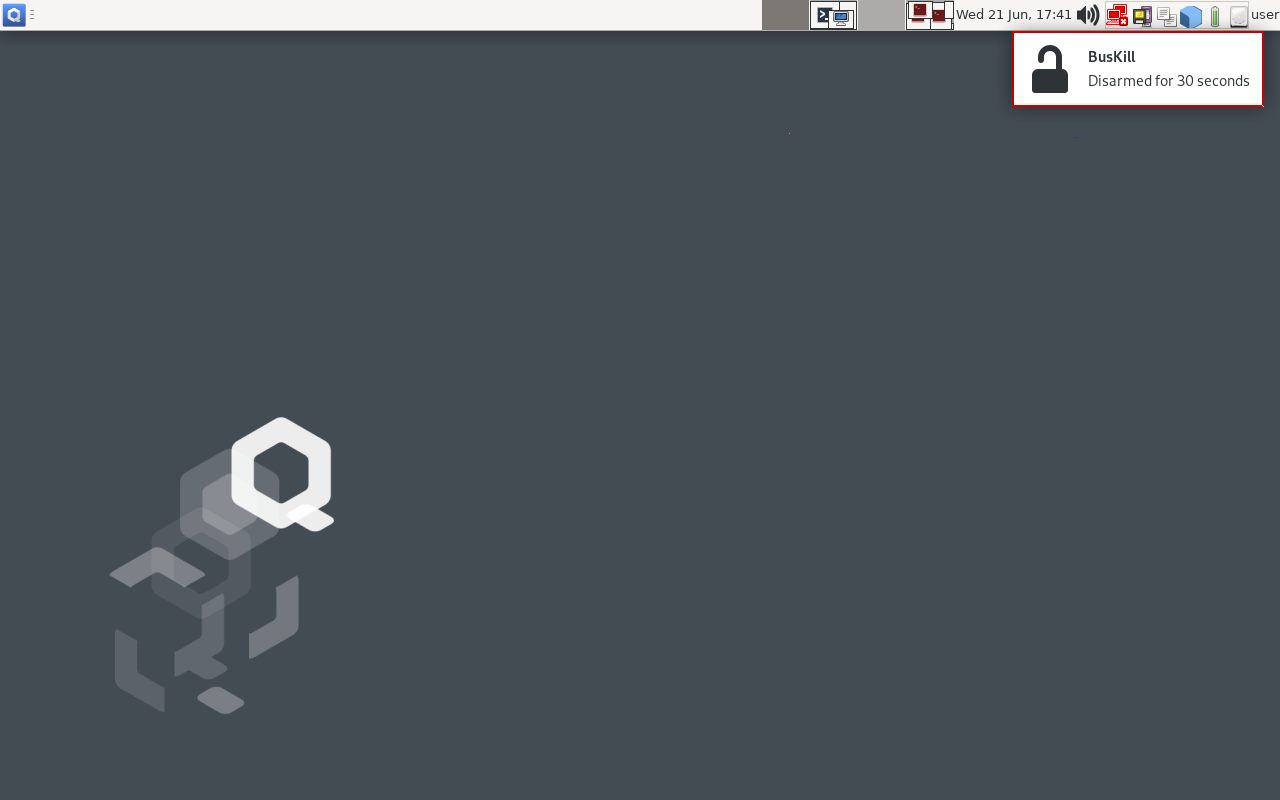
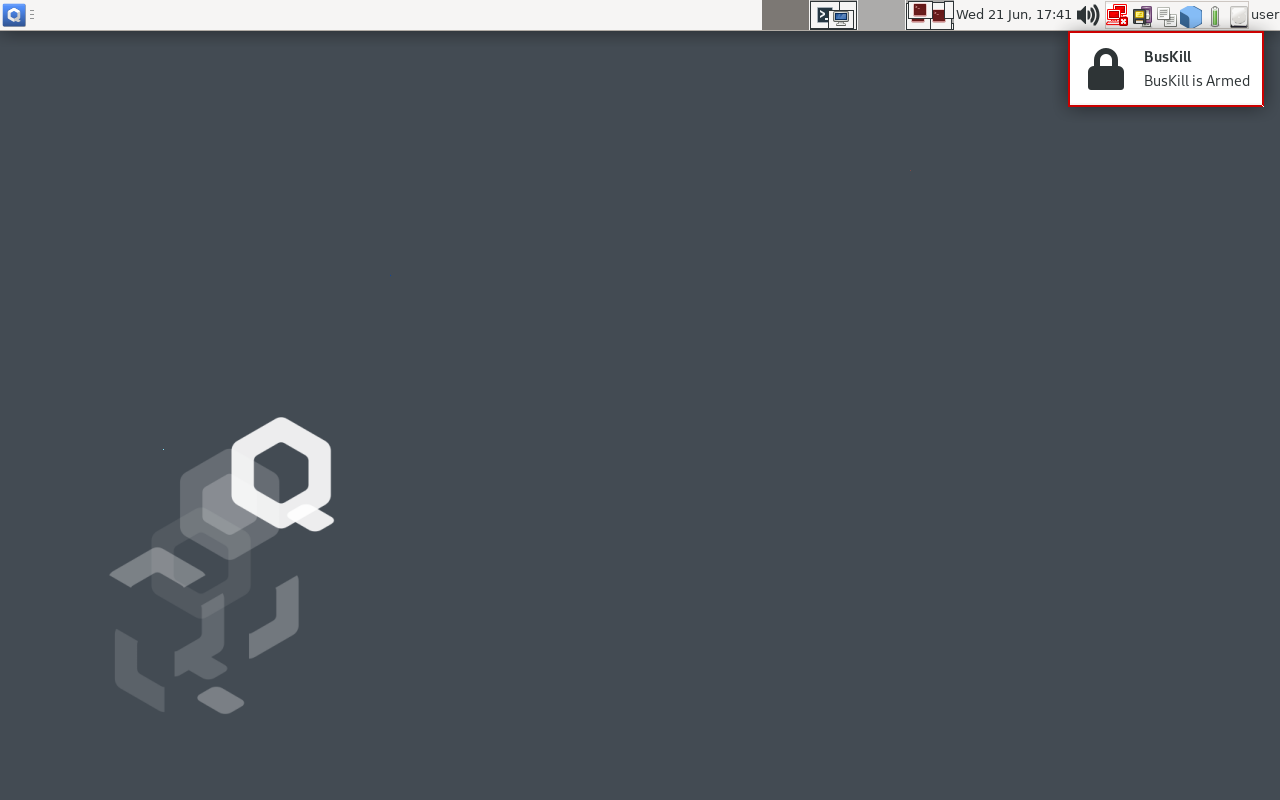
The careful reader will see that we’re not actually disarming BusKill in the same sense as our BusKill GUI app. Indeed, what we’re actually going to do is swap these two files for 30 seconds.
This way, if BusKill is armed and you remove the cable, your computer shuts-down.
But if you want to disarm, the procedure becomes:
- Hit the “Disarm BusKill” keyboard shortcut (see below)
- Wait for the toast popup message indicating that BusKill is now disarmed
- Remove the cable within 30 seconds
- Your screen locks (instead of shutting down)
Personally, I can’t think of a QubesOS user that would want to leave their machine unlocked when they go to the bathroom, so I figured this approach would work better than an actual disarm.
Bonus: when you return from your break, just plug-in the BusKill cable in, and it’ll already be armed (reducing the risk of user error due to forgetting to arm BusKill).
Now, let’s add the actual ‘buskill-disarm.sh‘ script to disarm BusKill:
Execute the following on your ‘sys-usb‘ Qube:
cat << EOF | sudo tee /usr/local/bin/buskill-disarm.sh
#!/bin/bash

################################################################################
# File:    sys-usb:/usr/local/bin/buskill-disarm.sh
# Purpose: Temp disarm BusKill. For more info, see: https://buskill.in/qubes-os/
# Authors: Tom <humandecoded.io>
# Co-Auth: Michael Altfield <michael@buskill.in>
# Created: 2023-05-10
# License: GNU GPLv3
################################################################################

# replace the 'shutdown' trigger with the 'lock' trigger
sudo rm /etc/udev/rules.d/buskill.rules
sudo ln -s /rw/config/buskill.lock.rules /etc/udev/rules.d/buskill.rules
sudo udevadm control --reload

# let the user know that BusKill is now temporarily disarmed
notify-send -t 21000 "BusKill" "Disarmed for 30 seconds" -i changes-allow

# wait 30 seconds
sleep 30

# replace the 'lock' trigger with the 'shutdown' trigger
sudo rm /etc/udev/rules.d/buskill.rules
sudo ln -s /rw/config/buskill.rules /etc/udev/rules.d/buskill.rules
sudo udevadm control --reload
notify-send -t 5000 "BusKill" "BusKill is Armed" -i changes-prevent
EOF
sudo chmod +x /usr/local/bin/buskill-disarm.sh
dom0
If you followed our previous guide to setting-up BusKill in QubesOS, then you shouldn’t need to add any files to dom0. What you do need to do is setup some keyboard shortcuts.
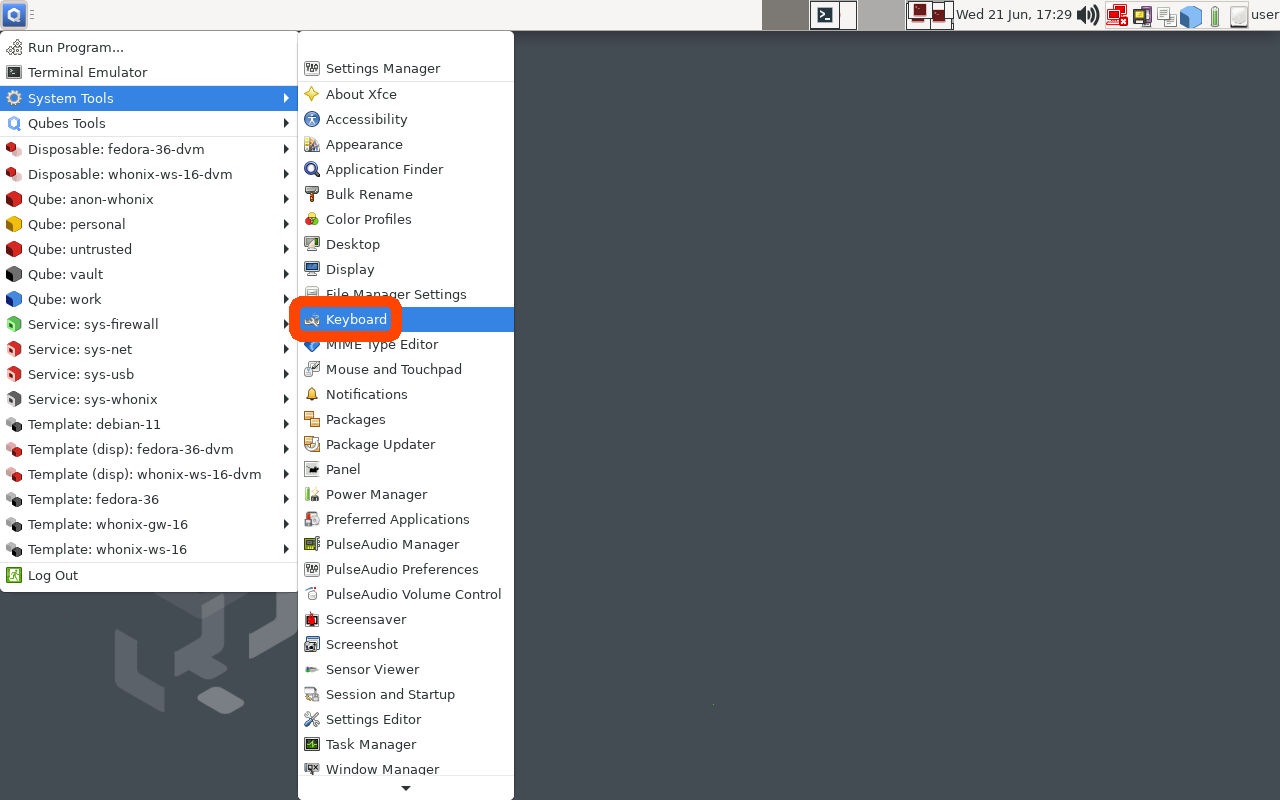
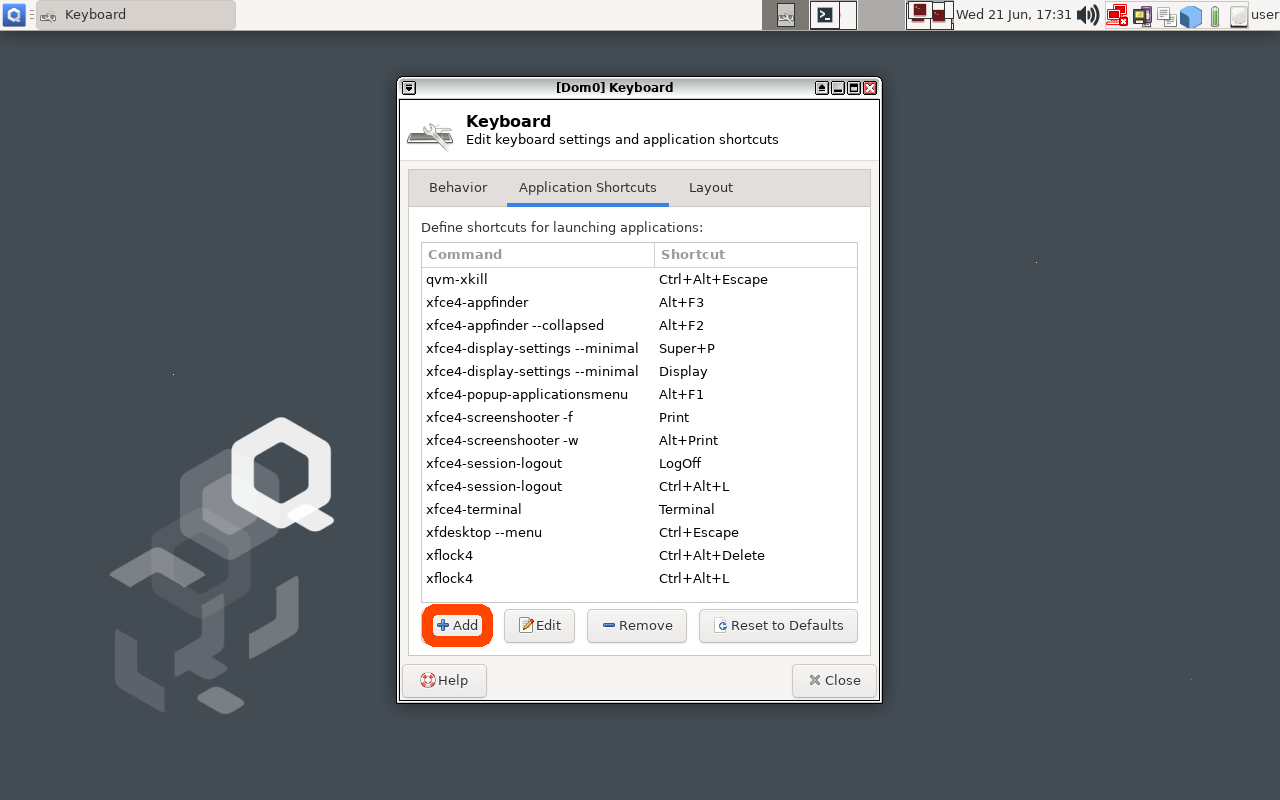
In the QubesOS GUI, click on the big Q “Start Menu” in the top-left of your XFCE panel to open the Applications menu. Navigate to ‘System Tools‘ and click Keyboard
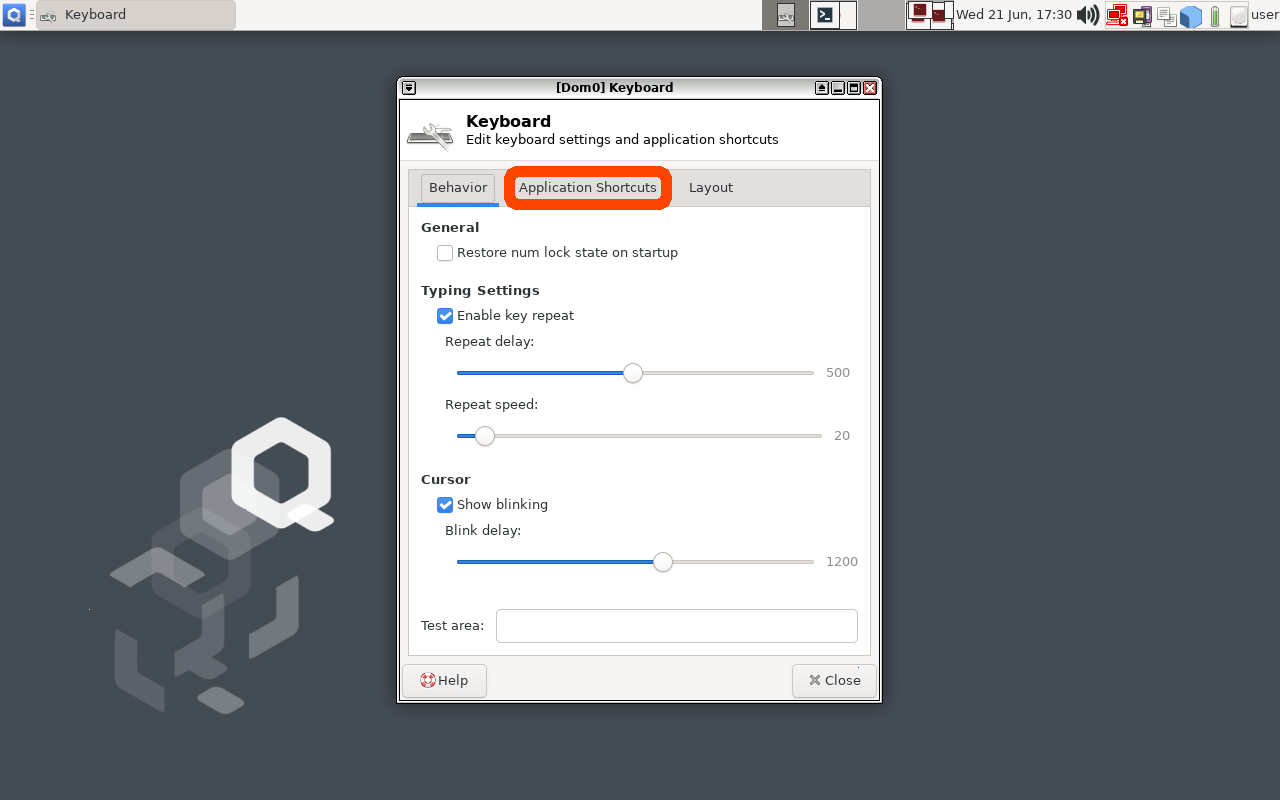
Click the ‘Application Shortcuts‘ Tab and then click the ‘+ Add‘ button on the bottom-left of the window.
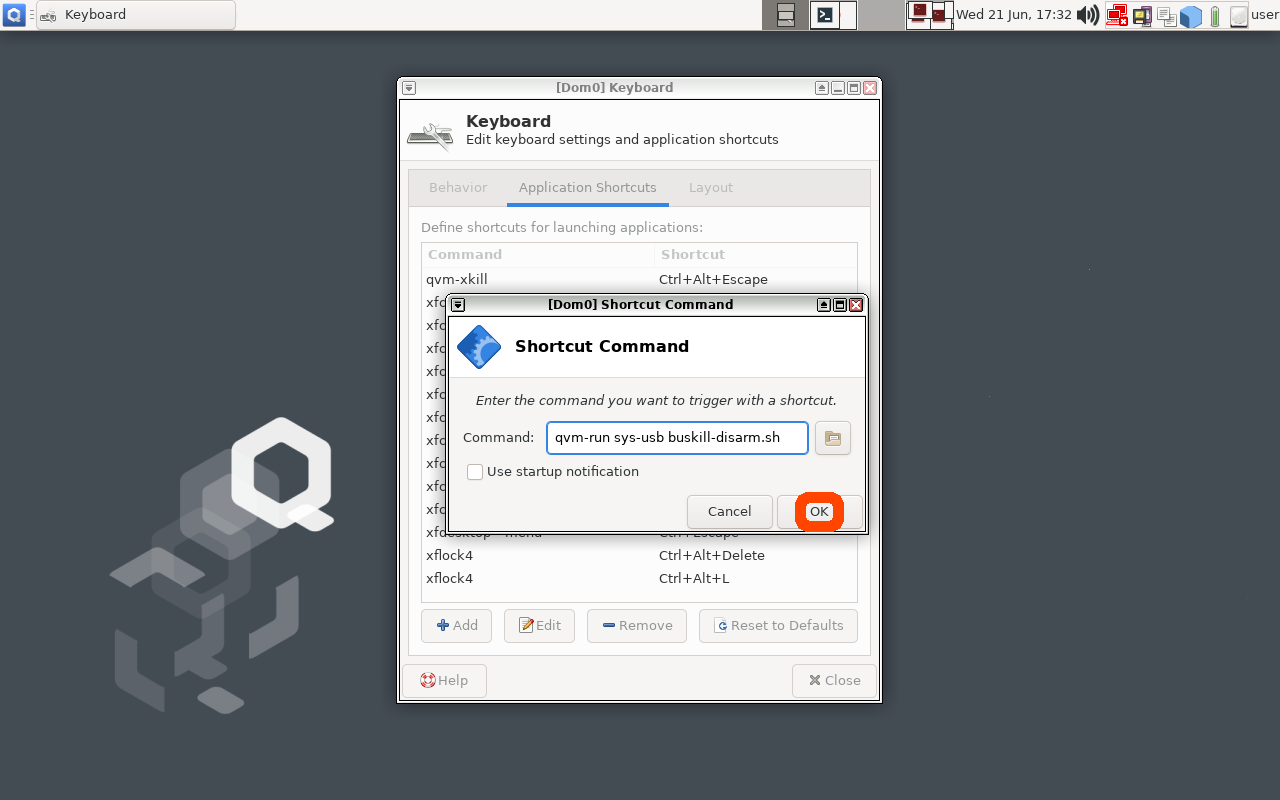
In the ‘Command‘ input field, type the following
qvm-run sys-usb buskill-disarm.sh
The above command will execute a command in ‘dom0‘ that will execute a command in ‘sys-usb‘ that will execute the ‘buskill-disarm.sh‘ script that we created above.
Now click “OK” and, when prompted, type Ctrl+Shift+D (or whatever keyboard shortcut you want to bind to “Disarming BusKill”).
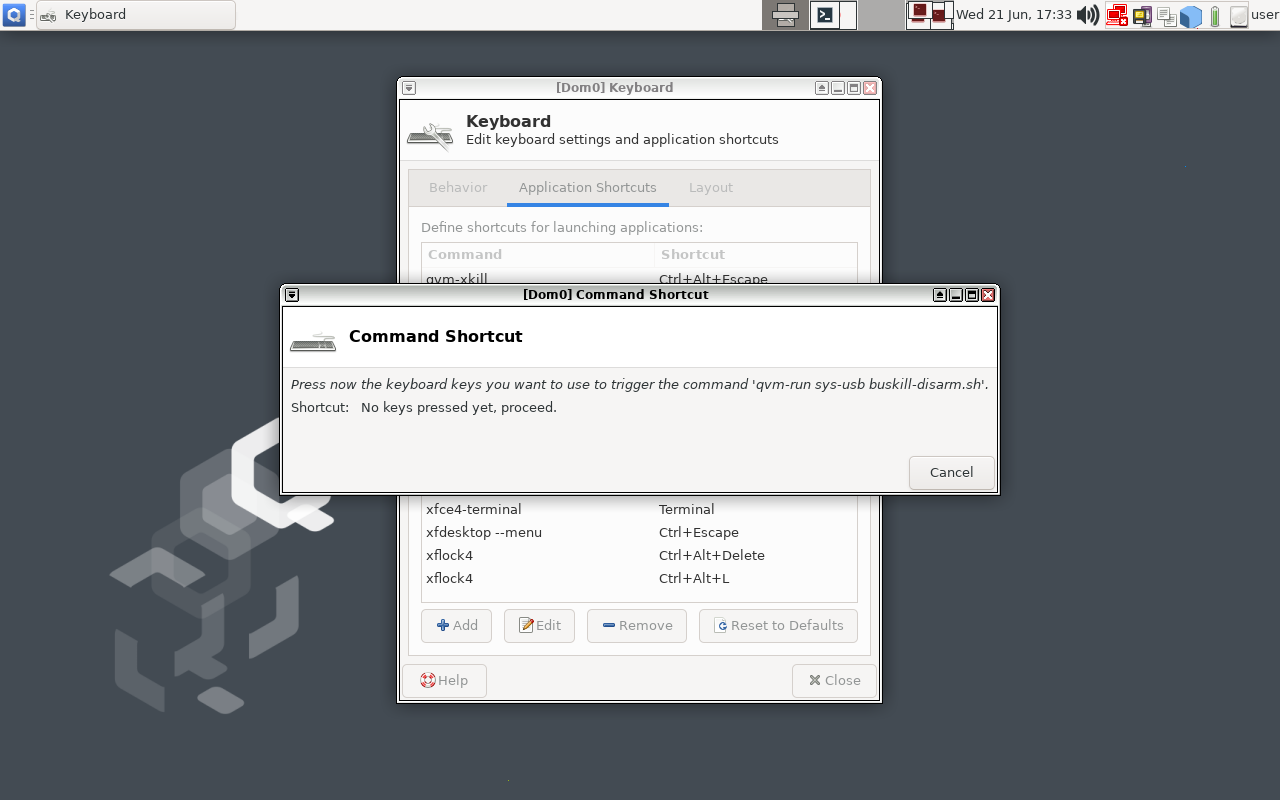

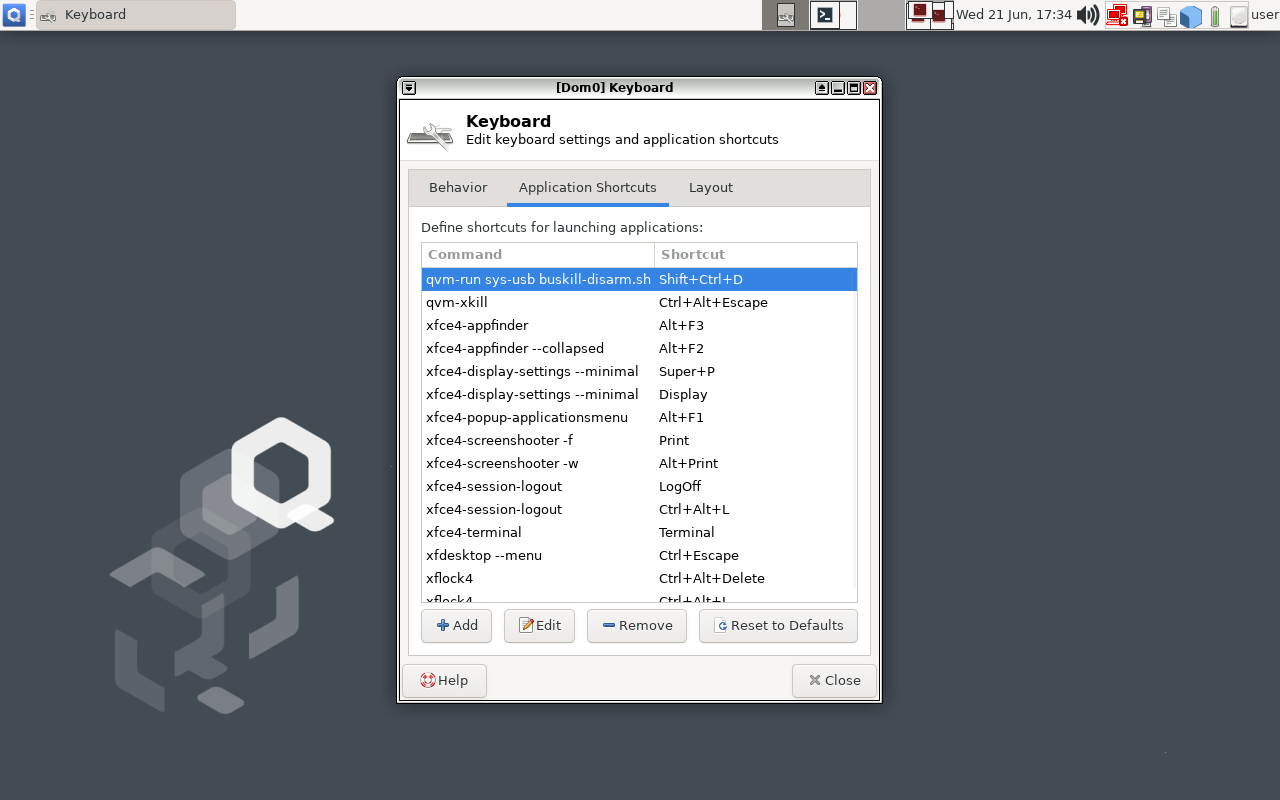
You should now have a keyboard shortcut binding for disarming BusKill!
Test It!
At this point, you can test your new (temporary) BusKill Disarm functionality by:
- Plugging-in your BusKill cable
- Typing Ctrl+Shift+D
- Waiting for the toast popup message to appear indicating that BusKill is disarmed for 30 seconds
- Unplugging your BusKill cable
Your machine should lock, not shutdown.
After 30 seconds, return to your computer and test the normal “arm” functionality:
- Plug-in your BusKill cable
- Unlock your screen
- Unplug your BusKill cable
Your computer should shutdown, not lock.
Troubleshooting
Is unplugging your USB device doing nothing? Having other issues?
See the Troubleshooting section in our original guide to using BusKill on QubesOS.
Limitations/Improvements
Security is porous. All software has bugs. Nothing is 100% secure.
For more limitations to using BusKill on QubesOS, see the Limitations section in our original guide to using BusKill on QubesOS.
If you’d like to purchase a BusKill cable, click here.
Stay Updated
To get email updates about future improvements to our compatibility with QubesOS, you can subscribe to our newsletter